Prep can be one of the most tedious parts of the painting process, however, it is one of the most important. Without proper prep, your painting project may take hours or days longer than it needs to, and not to mention, it will come out looking sloppy.
Prepping a room for painting properly is the difference between buying a 1999 honda civic and the same civic, but built-in 2023. However, prep is not the only important factor. The quality of paint, quality of materials, and technique will help you reap the most “oh wow’s” from your friends and family. It will also add more to your resale value.
Learn how repainting your house can increase its value: Repainting Your House Makes it SELL
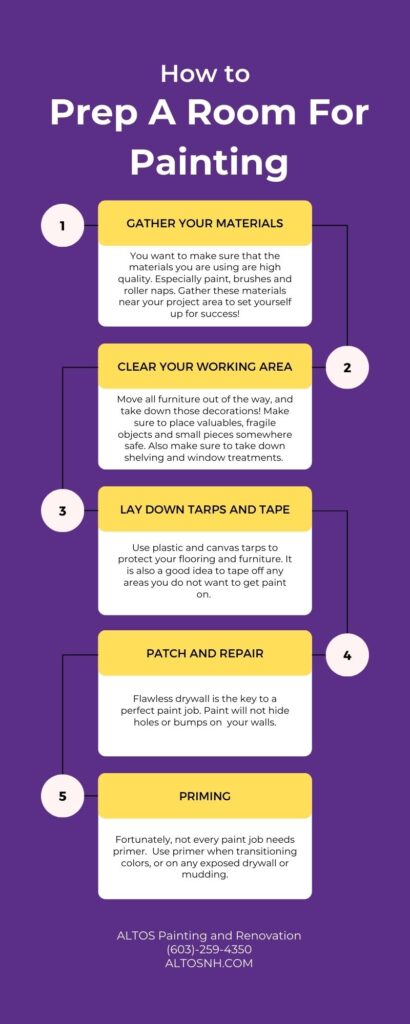
Prepping your space for paint can be broken down into five stages.
- Gather your materials
- Clear your working area
- Apply protective tarps and tape
- Patch and repair walls
- Prime appropriate surfaces
Gather Your Materials
Not all materials are made equally. Do a thorough amount of research to see which options are right for you. Cheaper materials will get the job done, but remember cheaper is not always better. If you are looking for high-quality materials we recommend visiting your local Benjamin Moore or Sherwin Williams and talking to a paint expert.
Sometimes buying the highest quality materials is not within the budget (we have all been there). Plus if you are only looking to paint a single room, and never paint again, then you may not want materials with all the extra frills.
Now that you have all of your materials, you are going to want to gather all of them near your working area. Sometimes it can be too crowded in your working space to store them all in the room (especially when it’s full of furniture). We recommend placing them in the hallway or right outside of the area you are painting. If you are unsure about which materials to buy, we have created a pdf with common painting supplies below.
Clear Your Working Area
The first step of clearing the area you are working in is to decide whether you want to move everything into the middle of the room, or if you will need to move everything into another room.
Not all spaces will allow you to work around a pile of furniture because they are simply too small.
Next, you will need to remove all decorations from the wall. This includes shelving, pictures, posters, and other decorations. You will also need to remove all outlet covers and window dressings. Make sure to have a bowl handy to place your screws and small fixtures!
Sometimes you can get away with leaving outlets, shelving, and window treatments up. Although this may look nice, removing these fixtures will save a headache later on if you decide to change the color again. When these fixtures are not removed, they will become painted on, leaving raised bumps and gluing the fixtures to the wall. This may create more damage than necessary if you need to replace outlet covers.
Here are the steps to remember:
- Move all furniture out of the way
- Remove all decorations
- Remove window treatments
- Remove outlet covers
- Place all small parts somewhere safe
Apply Protective Tarps and Tape
After clearing your workspace, it is time to unroll the tarps! You will need to cover all surfaces that will not be painted. This includes placing a tarp over all furniture still in the room and tarps on the floor. We recommend using 2.5 mil plastic for the area where you are storing your paint can. If you were to accidentally tip paint over, it will not bleed through the plastic onto the floor.
You may decide to use canvas drop cloths instead or in tandem with plastic coverings. They are less slippery, can be used time and time again, and will protect against most drips.
For creating the most secure area, use a 12” roll of paper (found at most home improvement and paint stores). Roll it out around the perimeter of your area using painter’s tape to secure it tight to the floor. Most drips will fall right off the walls onto the floor within this radius, so it is important to secure the area properly.
If you have a hard time cutting in (applying a straight line of paint) then it may be helpful to tape off areas such as your trim and ceilings. Please use green frog tape or the equivalent and NOT masking tape. Masking tape and other tapes will likely peel the surface and cause damage.
It may take a long time but straight lines are the first telltale sign of a perfect paint job. Painting the ceiling and trim first will help you minimize how many times you need to cut in. Since you will be painting the walls you can fix any imperfections later with your wall cut-ins.
Patch and Repair
Did you know that you can make your walls look brand new? Most homeowners may not be able to tell the difference. But the truth is, little knicks, holes, and bumps in your drywall add up. It’s one of those things where you don’t notice what was wrong until it is fixed. With a little bit of mud, sandpaper, and time, your walls will look brand new. Drywall is the secret to a perfect paint job. Without it, paint is merely a band-aid.
You may not be very good at mudding, and that is okay. There are a ton of resources online to help. Once you have done it once or twice you will start to get used to how the mud works, and how much to sand. One thing to remember is that you must sand, and clean the patches. There are different types of mud out there. Make sure to allow the mud the proper amount of time to dry before sanding or painting.
It is common for window sills to have many layers of peeling paint. If this is the case with your project, then you will either need to sand or strip the paint from these areas.
Priming
Not all paint jobs will need a primer but some will. Here is the general rule of thumb:
- Prime all exposed mudding
- Prime all exposed drywall
- Prime water damage (ask your local home improvement store for the right primer for water damage)
- Use primer when transitioning from dark to light
- Use tinted primer when transitioning from light to dark
- Prime exposed wood.
- Prime cabinets (use something like STIX) for priming.
Contact ALTOS Painting & Renovation for Painting Services + Tips
If you’re looking to hire a professional painter in New Hampshire, consider hiring ALTOS Painting & Renovation for all your interior and exterior painting needs. We’re fully insured, eager to work, and always do our best to make our customers 100% satisfied. We offer interior painting, exterior painting, cabinet painting, and drywall repair throughout southern New Hampshire.
Even if you’re not looking to hire, we’re happy to help you with expert advice!
ALTOS Painting & Renovation
(603) 259-4350
info@altosnh.com
309 Cilley Rd
Manchester, NH 03103


Hey there. Been dipping my toes into fatah777game. Nothing revolutionary, but alright for a bit of a gamble. Check fatah777game when you get the chance
Hey guys, been playing around in hawkplayonlinecasino! Not too shabby, might find something fun in there. Make sure to check hawkplayonlinecasino!
MNL63, you’re a lifesaver! Always a blast playing here. Check it out here mnl63.
Superphgame has a lot going on! So many games it’s almost overwhelming. Gotta dig in and find my favorites. You should check this one superphgame
Trying out the slots on jili7slotdemofree. Really enjoying the free demos, great way to learn new games without risking anything! Check it out here: jili7slotdemofree
Just logged into mb66dangnhap. The registration was so easy and their promotions is so worth it! Check it out here: mb66dangnhap
Alright, checked out bdbubu88 and not gonna lie, it was fun. Lots of different games to choose from, so you won’t get bored easily. Why not try bdbubu88, and tell me what you think?!
Bro, vnmh88 es la onda. Fácil de usar, buenos bonos y siempre estoy ganando algo. ¡Recomendado para todos! vnmh88
Vnw555, un lugar donde la suerte siempre está de mi lado. Tienen una buena selección de juegos y el servicio al cliente es excelente. ¡Denle una oportunidad! vnw555
All the details at the link: https://sagapaurt.com
Steam Desktop Authenticator https://authenticatorsteamdesktop.com is a PC app that lets you use the Steam Mobile Authenticator on your computer. It supports trade confirmation, account security, and managing two-factor authentication codes without using your smartphone.
Steam Desktop Authenticator https://steamdesktopauthenticator.net is a popular solution for Steam users who need access to Steam Guard features on their computer. It conveniently verifies actions, protects your account, and manages authentication in a single app.
Steam Desktop Authenticator https://sdasteam.com (SDA). It allows you to generate account login codes and automatically confirm trades or item sales on the Community Market without using your smartphone.
песок карьерный цена м3 доставка купить песок карьерный
Custom-made cabinets kitchen cabinets Tampa Bay
песок карьерный цена песок карьерный цена за куб
exchange tether to rubles instantly usdt to cash usd
обменять тезер на кеш мультивалютный обменник криптовалют
Все самое свежее здесь: https://kalipsosanteh.ru
Подробности по ссылке: https://yunistroizavod.ru
обмен стейблкоин на кеш лучший курс usdt к рублю
Extended Review: https://blockchainreporter.net/what-is-social-engineering/
Selected articles: https://blockchainreporter.net/how-to-use-binance-square-skill-for-ai-powered-content-automation/
Читать далее: https://rs-stroyka.ru
ремонт квартир капітальний ремонт квартири
https://perevozka-avtomobilya.ru стоимость автовоза
перевозка автомобиля автовоз доставка цена москва
подбор персонала услуги агентства кадровые агентства адрес
Longer Text Here: מחירי שירותי ליווי
Читать расширенную версию: https://spainslov.ru/site/word/word/%D0%A0%D0%95%D0%9D%D0%A2%D0%90
Все подробности по ссылке: https://valenkistyle.ru
санэпидемстанция в москве телефон тараканы дезинфекция москва с гарантией
Do you love excitement? https://jerseysbeststore.com/tips offers premium pre-match and live sports betting, as well as a legal online casino. Try your luck on modern slots, table games, or with live dealers. We guarantee complete data security, fair results, and 24/7 player support.
Do you love excitement? https://jerseysbeststore.com/tips offers premium pre-match and live sports betting, as well as a legal online casino. Try your luck on modern slots, table games, or with live dealers. We guarantee complete data security, fair results, and 24/7 player support.
купить ленту стальную от производителя лента стальная цена
usdt to cash usd https://exchange-usdt-cash.com
Современный строительный https://dki.org.ua портал с обзорами технологий, материалов и инструментов. Читайте статьи о строительстве частных домов, ремонте помещений, инженерных коммуникациях и эффективных решениях для комфортного проживания.
Портал о строительстве https://fmsu.org.ua и ремонте с подробными руководствами, обзорами оборудования и строительных материалов. Узнавайте о новых технологиях, современных решениях и практическом опыте специалистов отрасли.
Ремонт и строительство https://intellectronics.com.ua информационный портал о современных технологиях, строительных материалах и практических решениях для дома. Полезные статьи, обзоры, инструкции и советы специалистов для успешной реализации проектов любой сложности.
Строительство и ремонт https://keravin.com.ua для дома, квартиры и дачи. Полезные статьи о проектировании, отделке, инженерных коммуникациях, благоустройстве территории и современных решениях для комфортной жизни.
Информационный сайт https://kero.com.ua о ремонте и строительстве с рекомендациями по выбору материалов, организации работ и применению современных технологий. Полезный ресурс для частных застройщиков и профессионалов отрасли.
Портал о строительстве https://purr.org.ua домов, ремонте квартир и благоустройстве участков. Читайте статьи о строительных технологиях, дизайне интерьеров, выборе подрядчиков и современных тенденциях отрасли.
Полезный строительный https://quickstudio.com.ua блог с идеями для ремонта, обустройства дома и повышения комфорта. Читайте обзоры материалов, советы специалистов и вдохновляйтесь новыми проектами.
Ремонт и строительство https://sushico.com.ua от профессионалов: обзоры технологий, рекомендации по выбору материалов, советы по организации работ и полезная информация для владельцев домов, квартир и коммерческой недвижимости.
In 2026 is ideal casino nog altijd de populairste keuze onder Nederlandse gokkers — snel, veilig en nu verrijkt met het Wero-systeem. Kwalitatieve iDEAL casino’s staan bekend om directe uitbetalingen, een gevarieerd spelaanbod en volledige naleving van de KSA-vereisten.
Do you like excitement? payid casino bonus choosing the right casino comes down to more than just game selection. For players in Australia, seamless AUD bank transfers via PayID have become a deciding factor — offering a level of speed and security that credit cards and e-wallets simply can’t match.
Hrajete v kasinu? nejlepsi zahranicni casino lakaji ceske hrace cim dal vice — a neni se cemu divit. Bohatsi herni knihovna, stedrejsi bonusy a moznost platit kryptomenami delaji z techto platforem zajimavou alternativu k tuzemskym kasinum. Nize najdete proverene zahranicni weby dostupne ceskym hracum v roce 2026.
Najlepsze kasyno online wyplacalne kasyna online szybka wyplata wygranych to dla polskich graczy jeden z najwazniejszych kryteriow wyboru kasyna. Wyplacalne kasyna internetowe wyrozniaja sie nie tylko sprawnymi transakcjami, ale tez rzetelnoscia i stabilnym dzialaniem — bez zbednych opoznien i ukrytych warunkow.
the very best instant payout casino australian players know the frustration of slow withdrawals — and the best casinos have listened. Instant withdrawal platforms now process payouts in real time, sending your AUD winnings straight to your bank account or digital wallet without unnecessary delays or paperwork.
Nie kazdy wie, ze zagraniczne kasyna moga oferowac znacznie wiecej niz rodzime platformy. Od wiekszych bonusow powitalnych po blyskawiczne wyplaty i gry niedostepne w Polsce — wybor jest ogromny. Zebralismy dla ciebie najlepsze i najbezpieczniejsze opcje dostepne dla polskich graczy.
Chcete hrat bez zbytecne byrokracie? online casino bez overeni identity umoznuji ceskym hracum okamzity pristup ke hram bez nutnosti dokladat osobni doklady. Rychla registrace, anonymni hrani a rychle vyplaty — to jsou hlavni duvody, proc si tato casina ziskavaji stale vice priznivcu.
Разбираем, почему не работает 1win и какие причины могут вызывать проблемы с доступом. Возможные технические сбои, обновления сервиса, ошибки подключения, ограничения провайдера и способы проверки работоспособности сайта.
Что делать, если 1win не выводит деньги? Разбираем возможные причины задержек выплат, особенности проверки аккаунта, статусы заявок и распространенные проблемы, с которыми могут столкнуться пользователи при выводе средств.
Профессиональная верификация гугл мой бизнес для компаний, которые хотят подтвердить профиль организации и повысить доверие клиентов. Корректно оформленная карточка помогает улучшить видимость бизнеса в Google Поиске и на Картах, привлекать новых клиентов и управлять информацией о компании.
Ваш провідник у житті Луцька https://43000.com.ua новини міста, культурні події, афіша заходів, бізнес, освіта та корисні поради для мешканців і гостей. Уся важлива інформація про Луцьк в одному місці.
Современный портал https://rus3edin.org.ua о строительстве и ремонте с материалами по проектированию, отделке, утеплению, монтажу инженерных систем и благоустройству территории. Все необходимое для успешной реализации строительных проектов.
Строительные идеи https://texha.com.ua ремонтные решения и полезные советы для дома. Узнавайте о современных технологиях, надежных материалах, инженерных системах и способах сделать жилье комфортным, функциональным и долговечным.
Портал об автомобилях https://diesel.kyiv.ua и современных транспортных технологиях. Статьи о новых моделях, сравнительные обзоры, рекомендации по обслуживанию и полезная информация для каждого автомобилиста.
charter yacht montenegro yacht charter tivat
Ваш гид в мире ремонта https://tfsm.com.ua и строительства. Пошаговые инструкции, обзоры строительных материалов, советы мастеров и практические решения для ремонта квартир, строительства домов и благоустройства участков.
Мир дизайна https://vineyardartdecor.com и интерьера с вдохновляющими проектами, экспертными рекомендациями и полезными статьями. Узнайте, как создать красивое, практичное и современное пространство для жизни и работы.
От фундамента до декора https://vodocar.com.ua все о строительстве и ремонте в одном месте. Актуальные статьи, экспертные рекомендации, обзоры новинок рынка и проверенные решения для частных и коммерческих объектов.
Современный портал https://zlochinec.kyiv.ua для мужчин о здоровье, саморазвитии, бизнесе и увлечениях. Практические рекомендации, актуальные новости и вдохновляющие истории для тех, кто стремится к новым достижениям.
Мир женских интересов https://amideya.com.ua в одном информационном ресурсе. Читайте статьи о моде, здоровье, карьере, семье и путешествиях, находите полезные рекомендации и вдохновение на каждый день.
Мир автомобилей https://auto-club.pl.ua в одном месте: автоновости, обзоры, рейтинги, советы по ремонту и обслуживанию. Следите за новинками автопрома, узнавайте о характеристиках моделей и тенденциях автомобильного рынка.
Строительный журнал https://buildingtips.kyiv.ua для тех, кто строит, ремонтирует и обустраивает недвижимость. Полезные публикации о технологиях строительства, дизайне интерьеров, выборе подрядчиков и современных материалах.
Все о современном https://dcsms.uzhgorod.ua доме: строительство, ремонт, интерьер и благоустройство. Экспертные статьи, обзоры материалов и полезные рекомендации для создания комфортного пространства для жизни.
Строительство без ошибок https://donbass.org.ua начинается здесь. Узнавайте о новых технологиях, популярных строительных материалах, особенностях ремонта и эффективных решениях для жилой и коммерческой недвижимости.
Практический портал https://dsmu.com.ua о ремонте, строительстве и обустройстве жилья. Реальные советы, инструкции и обзоры помогут сократить расходы, повысить качество работ и добиться отличного результата.
Pizza Venezia — Итальянская пицца в Москве https://pizza-venezia.ru быстрая доставка горячей пиццы, пасты, закусок и десертов. Свежие ингредиенты и классические рецепты.
На платформе собраны фильмы онлайн на любой вкус и категорий – от последних киноновинок до легендарных фильмов, к которым хочется возвращаться. Мы разместили в единой библиотеке большой каталог видеоконтента, чтобы зрители могли быстро найти подходящий фильм для просмотра. Большая часть контента представлена в высоком HD качестве, а количество рекламы сведено к минимуму, чтобы просмотр оставался комфортным. Каталог регулярно пополняется, добавляя свежие премьеры и популярные проекты, о которых говорят зрители по всему миру.
Проблемы со здоровьем? клинический медицинский центр прием врачей различных специальностей, точная диагностика, профилактические обследования и индивидуальный подход к каждому пациенту. Забота о здоровье с использованием современных методов лечения.
летний лагерь языковой лагерь осенние каникулы
The CS2 Pro counter strike portal features the latest Counter-Strike 2 news, live match results, tournament schedules, and analysis. Learn about professional scene events, team rankings, and the top stories from the world of CS2.
With Valorant Tracker valorant fa you can learn about professional player settings, find the best aim, track ranks, and analyze match statistics. A useful tool for improving your skills and progressing more effectively in VALORANT.
Valorant Tracker https://www.valorant-th.com is your companion in the world of VALORANT. Professional player settings, the best crosshair codes, current ranks, match statistics, and detailed analytics will help you improve your gaming skills and climb the ranking ladder faster.
Everything about VALORANT valorant-bn.com in one place: professional settings, crosshair codes, ranks, player stats, and match analytics. Valorant Tracker helps you track your achievements, learn from the best players, and improve your gameplay.
GTA 6 release date gta6-online price, platforms, map, and all the information about one of the most anticipated games of recent years. Learn about the official release, available platforms, details about the world of Leonida and Vice City, new characters, gameplay features, and the latest news from Rockstar Games.
Everything about sports https://nso-online.hu/ for true fans. Watch live broadcasts, get match results in real time, read the latest news, analytical articles, tournament reviews, and follow the achievements of your favorite teams and players.
Play for free https://poki.hu/ right in your browser without installing any additional software. A huge selection of games across various genres: action, logic, sports, racing, simulation, and adventure. Find your favorite games and enjoy online gaming.
The 2025/26 La Liga https://www.laliga-tabella.hu standings feature up-to-date data for all teams in the Spanish league. Track points, matches played, wins, draws, and losses, as well as explore matchday results, game schedules, and season statistics.
UEFA Champions League 2025/26 uefa-bl the latest standings, match schedule, results, and detailed tournament statistics. Follow the season, check live results, explore the playoff bracket, and find out about tickets for the final of Europe’s premier club competition.
The latest sports news nemzeti-sport-online.hu live streams, and competition results from around the world. Football, Formula 1, tennis, hockey, basketball, and other sports. Match schedules, team statistics, tournament highlights, and key daily events.
More details One click: מספר טלפון שירותי ליווי
подбор персонала услуги агентства подбор персонала кадров
лента стальная нержавеющая лента стальная мягкая
The best is right here: שירותי ליווי
Самое интересное: https://sozidaya.ru/category/odezhda-dlya-malchikov/
Только лучшие материалы: https://slovarsbor.ru/w/%D1%86%D0%B2%D0%B5%D1%82%D0%BD%D0%B8%D0%BA/
Все подробности по ссылке: https://paradstars.com
Лучшее прямо здесь: https://l-parfum.ru/catalog/Gucci/glorious-mandarin/
Сравнение займ на карту без отказа онлайн начинается прежде всего с грамотного анализа предложений, и специально для этого подготовлен наш информационный сервис. Мы собрали и регулярно актуализируем информацию по 35 официальным МФО, которые работают в рамках действующего законодательства и предоставляют займы со ставкой не выше 0,8% в день. На сайте можно изучить сумму, срок, требования к заемщику, условия первого займа и скорость получения денег. После выбора оптимального предложения вы можете получить займ онлайн на карту и получить до 30 000 рублей в кратчайшие сроки. Многие компании обрабатывают заявки без выходных, а решение по анкете часто поступает в течение нескольких минут. Для оформления обычно потребуются паспорт, банковская карта и возраст от 18 лет.
Последние обновления: https://lovely-face.ru
электрик срочно https://electro-master-msk.ru
Хочешь клубнику? доставка клубники свежие, спелые и ароматные ягоды по выгодным ценам. Сезонная клубника от проверенных поставщиков, оптовые и розничные продажи, быстрая доставка по городу и области.
Ремонт грузовых автомобилей https://minskdiesel.by в Минске? Сервис «Дизель Практик» вернёт технику в строй в кратчайшие сроки! Срочный ремонт, выездная диагностика, запчасти в наличии. Доверьтесь профессионалам с многолетним опытом — надёжность и прозрачность на каждом этапе.
нарколог дом выездной нарколог
вызов наркологической помощи на дом нарколог круглосуточно
вызов нарколога на дом нарколог капельница на дом
нарколог на выезд платный нарколог на дом
вызвать нарколога на дом цены недорого нарколог круглосуточно
The 2025/26 Premier League premier-league-tabella table, featuring the current standings, points totals, and match results. Follow the battle for the championship, European places, and league status. Game schedules, statistics, matchday overviews, and the latest season data are available.
NBA standings nbi-tabella match results, game schedule, and the latest basketball season news. Follow conference standings, player stats, game results, the tournament schedule, and all the important events of the National Basketball Association.
The latest NBA https://nb1-tabella.hu standings with match results, schedule, and the latest basketball news. Learn about team and player achievements, track standings, explore statistics, and get highlights of the season’s most exciting games.
NBA news https://nb2-tabella.hu/ game results, schedules, and the latest season standings. Get the latest information on teams, players, and the tournament, analyze statistics, and follow the championship race and playoff progress.
The latest Liverpool news https://liverpool-meccs.hu fixtures, and season results. Get up-to-date information on team performances, lineup changes, player achievements, match statistics, and key events in English and European football.
Liverpool’s league table https://liverpool-tabella.hu/ shows the team’s current standings, points earned, and form. Follow the team’s latest match results, win/loss statistics, season dynamics, and the battle for top spots in the standings.
Купите кофемашины https://incoffeein.by кофе и чай в Минске с гарантией качества и удобной доставкой. Большой ассортимент моделей для дома и офиса, свежий кофе разных сортов, ароматный чай, расходные материалы и профессиональная помощь в выборе.
Нужен надежный склад https://www.0342.ua/list/433153 для вашего бизнеса? Предлагаем ответственное хранение товаров, паллет, оборудования и грузов. Современные складские комплексы, круглосуточная охрана, учет остатков и оперативная обработка заказов. Оптимизируйте логистику и сократите расходы вместе с нами!
салон тату и пирсинга тату салон рядом со мной
Podcast studio Bali https://studiosnearyou.com/blog/best-podcast-studio-bali/ — a guide comparing the 5 best by location, hourly rate and what you get for the money, from budget rooms to full video production. Honest picks, real 2026 rates, no fluff.
сделать тату в питере тату салон санкт петербург
салон тату и пирсинга сделать тату в спб цены
solana casino vergleich https://sol-casino-liste.de/
Že dolgo nisem vedel, kako naprej. Potem pa sem dobil pravi nasvet in vse se je postavilo na svoje mesto. Govorim o zdravljenju alkoholizma pri Dr Vorobjevu. Veste, ni lahko, ampak se da premagati. In kar je najpomembneje – ni treba v bolnišnico. Vse informacije in izkušnje drugih sem podrobno pregledal na spletni strani, posodobljene podatke pa si lahko ogledate tukaj: zdravljenje alkoholizma zdravljenje alkoholizma. Meni so resnično pomagali.
Če vi ali kdo od vaših bližnjih ne ve, kam se obrniti – resnično priporočam. Vse se da, če hočeš.
Zdravo, ljudje. Preizkusil sem že vse mogoče. Ko gre za zdravljenje alkoholizma — veliko ljudi se muči v tišini. Prijatelj mi je svetoval en center, kjer res vedo, kaj delajo. Govorim o zdravljenju po metodi dr. Vorobjeva. Več informacij je na voljo tu: zdravljenje alkoholizma zdravljenje alkoholizma Meni so res pomagali. Odvisnost od alkohola je bolezen, ne sramota. Ampak ko vidiš, da nisi sam — upanje se vrne. Vsekakor priporočam vsem, ki se spopadajo s to težavo. Srečno na tej poti!
Veliko sem prebral in slišal o tem. Ko sem prvič slišal za ambulantno zdravljenje alkoholizma po metodi Dr Vorobjev centra, sem bil neveren. Ampak ko sem spoznal ljudi, ki jim je uspelo — vse se je spremenilo. Vsak dan se veliko ljudi bori s to težavo. In najhuje je, da ne poznajo dobrih možnosti zdravljenja. Zato svetujem, da si vzamete čas in preberete posodobljene podatke, ki so na voljo na tej povezavi: zdravljenje alkoholizma zdravljenje alkoholizma. Več o tem si preberite na spodnji povezavi.
Zdaj živim polno življenje brez alkohola. Če poznate koga, ki potrebuje pomoč — vzemite si čas in preberite. Srečno vsem na tej poti!
Že dolgo nisem vedel, kako naprej. Potem pa sem izvedel za center in vse se je začelo obračati na bolje. Govorim o zdravljenju alkoholizma pri strokovnjakih, ki res znajo pomagati. Veste, odvisnost od alkohola ni sramota. In kar je najpomembneje – ni treba v bolnišnico. Vse informacije in izkušnje drugih sem podrobno pregledal na spletni strani, posodobljene podatke pa si lahko ogledate tukaj: odvajanje od alkohola odvajanje od alkohola. Zdaj sem že pol leta trezen in ponosen nase.
Če kogarkoli, ki ga imate radi se sooča s to težavo – ne odlašajte. Vse se da, če hočeš.
Zdravo, ljudje. Dolgo časa nisem vedel, kam naprej. Ko gre za ambulantno zdravljenje alkoholizma — ni šala. Prijatelj mi je pokazal en center, kjer res vedo, kaj delajo. Govorim o Dr Vorobjev centru. Preverite sami na povezavi: ambulantno zdravljenje alkoholizma http://www.alkoholizem-zdravljenje.com Meni so res pomagali. Odvisnost od alkohola je bolezen, ne sramota. Ampak ko vidiš, da nisi sam — upanje se vrne. Vsekakor priporočam vsem, ki se spopadajo s to težavo. Ne obupajte!
Dolgo sem iskal pravo rešitev. Ko sem prvič slišal za ambulantno zdravljenje alkoholizma po metodi Dr Vorobjeva, sem bil poln dvomov. Ampak ko sem prebral izkušnje anderen — vse se je spremenilo. Vsak dan se veliko ljudi bori s to težavo. In najhuje je, da ljudje se sramujejo prositi za pomoč. Zato svetujem, da si vzamete čas in preberete posodobljene podatke, ki so na voljo na tej povezavi: odvisnost od alkohol odvisnost od alkohol. Na tej povezavi so odgovori na vsa vprašanja.
Meni je ta pristop pomagal. Če vas to zanima — to je lahko prelomnica v vašem življenju. Vsak dan je nova priložnost.
Že dolgo nisem vedel, kako naprej. Potem pa sem naletel na eno mesto in vse se je spremenilo. Govorim o ambulantnem zdravljenju alkoholizma pri Dr Vorobjev centru. Veste, ni lahko, ampak se da premagati. In kar je najpomembneje – program je prilagojen posamezniku. Več o tem in o izkušnjah pacientov si lahko preberete neposredno na uradnem viru: odvisnost od alkohol odvisnost od alkohol. Po prvem tednu sem začutil razliko.
Če kogarkoli, ki ga imate radi se sooča s to težavo – ne odlašajte. Srečno!
Pozdravljeni. Preizkusil sem že vse mogoče. Ko gre za zdravljenje alkoholizma — to je res težka zadeva. Prijatelj mi je svetoval en center, kjer ne obetajo nemogočega. Govorim o Dr Vorobjev. Več informacij je na voljo tu: ambulantno zdravljenje alkoholizma https://www.alkoholizem-zdravljenje.com Najboljša odločitev, kar sem jih kdaj sprejel. Odvisnost od alkohola je bolezen, ne sramota. Ampak ko enkrat najdeš pravo pomoč — življenje dobi nov smisel. Če kdo dvomi, naj kar pokliče in vpraša. Vsak nov dan je priložnost.
Že dolgo nisem vedel, kako naprej. Potem pa sem dobil pravi nasvet in vse se je spremenilo. Govorim o zdravljenju alkoholizma pri Dr Vorobjevu. Veste, alkoholizem je bolezen, ne slabost. In kar je najpomembneje – ni treba v bolnišnico. Vse informacije in izkušnje drugih sem podrobno pregledal na spletni strani, posodobljene podatke pa si lahko ogledate tukaj: odvajanje od alkohola odvajanje od alkohola. Zdaj sem že pol leta trezen in ponosen nase.
Če vi ali kdo od vaših bližnjih potrebuje pomoč – resnično priporočam. Srečno!
Živjo vsem. Že dolgo sem iskal resnično rešitev. Ko gre za ambulantno zdravljenje alkoholizma — to je res težka zadeva. Prijatelj mi je pokazal en center, kjer ne obetajo nemogočega. Govorim o Dr Vorobjev centru. Preverite sami na povezavi: zdravljenje alkoholizma zdravljenje alkoholizma Po nekaj tednih sem začutil razliko. Prvi korak je vedno najtežji. Ampak ko dobiš strokovno podporo — življenje dobi nov smisel. Vsekakor priporočam vsem, ki se spopadajo s to težavo. Ne obupajte!
Že kar nekaj časa spremljam to temo. Ko sem prvič slišal za odvajanje od alkohola po metodi Dr Vorobjeva, sem bil skeptičen. Ampak ko sem spoznal ljudi, ki jim je uspelo — vse se je spremenilo. Odvisnost od alkohola je strašna bolezen. In najhuje je, da mnogi ne vedo, kam se obrniti. Zato priporočam, da preverite celoten postopek na spletni strani, ki so na voljo na tej povezavi: odvisnost od alkohol odvisnost od alkohol. Več o tem si preberite na spodnji povezavi.
Zdaj živim polno življenje brez alkohola. Če vas to zanima — vzemite si čas in preberite. Upam, da vam bo koristilo!
Dolga leta sem se boril sam. Potem pa sem izvedel za center in vse se je postavilo na svoje mesto. Govorim o zdravljenju alkoholizma pri Dr Vorobjev centru. Veste, ni lahko, ampak se da premagati. In kar je najpomembneje – lahko ostanete doma. Več o tem in o izkušnjah pacientov si lahko preberete neposredno na uradnem viru: Dr Vorobjev http://www.zdravljenjealkoholizma.com. Po prvem tednu sem začutil razliko.
Če kogarkoli, ki ga imate radi potrebuje pomoč – resnično priporočam. Vse se da, če hočeš.
Živjo vsem. Dolgo časa nisem vedel, kam naprej. Ko gre za odvajanje od alkohola — ni šala. Prijatelj mi je pokazal en center, kjer res vedo, kaj delajo. Govorim o zdravljenju po metodi dr. Vorobjeva. Več informacij je na voljo tu: zdravljenje alkoholizma zdravljenje alkoholizma Po nekaj tednih sem začutil razliko. Odvisnost od alkohola je bolezen, ne sramota. Ampak ko dobiš strokovno podporo — življenje dobi nov smisel. Če kdo dvomi, naj kar pokliče in vpraša. Vsak nov dan je priložnost.
Dolga leta sem se boril sam. Potem pa sem dobil pravi nasvet in vse se je spremenilo. Govorim o odvajanju od alkohola pri Dr Vorobjev centru. Veste, odvisnost od alkohola ni sramota. In kar je najpomembneje – lahko ostanete doma. Vse informacije in izkušnje drugih sem podrobno pregledal na spletni strani, posodobljene podatke pa si lahko ogledate tukaj: Dr Vorobjev center http://www.zdravljenjealkoholizma.com. Meni so resnično pomagali.
Če nekdo v vaši okolici se sooča s to težavo – najboljša odločitev je poklicati. Vse se da, če hočeš.
Veliko sem prebral in slišal o tem. Ko sem prvič slišal za zdravljenje alkoholizma po metodi Dr Vorobjeva, sem bil skeptičen. Ampak ko sem videl rezultate — moje mnenje se je obrnilo. Odvisnost od alkohola je strašna bolezen. In najhuje je, da ljudje se sramujejo prositi za pomoč. Zato priporočam, da preverite celoten postopek na spletni strani, ki so na voljo na tej povezavi: zdravljenje alkoholizma zdravljenje alkoholizma. Na tej povezavi so odgovori na vsa vprašanja.
Po dolgih letih sem končno našel rešitev. Če vas to zanima — vzemite si čas in preberite. Upam, da vam bo koristilo!
китайский язык китайский язык
Zdravo, ljudje. Že dolgo sem iskal resnično rešitev. Ko gre za zdravljenje alkoholizma — veliko ljudi se muči v tišini. Prijatelj mi je priporočil en center, kjer imajo izkušnje. Govorim o zdravljenju po metodi dr. Vorobjeva. Vse podrobnosti in izkušnje drugih ljudi najdete tukaj: ambulantno zdravljenje alkoholizma http://alkoholizem-zdravljenje.com Po nekaj tednih sem začutil razliko. Ni lahko priznati si, da imaš težavo. Ampak ko enkrat najdeš pravo pomoč — življenje dobi nov smisel. Če kdo dvomi, naj kar pokliče in vpraša. Srečno na tej poti!
Знаете, куча народу сталкивается. Каждые выходные одно и то же. В этом вопросе очень важно не слушать советы алконавтов из подворотни. Нашел нормальный вариант — выведение из запоя без госпитализации. Клиника с лицензией. Короче, актуальный прайс и условия тут — выведение из запоя на дому https://vyvod-iz-zapoya-na-domu-voronezh-kmp.ru Не тяните резину, потому что алкоголь — это яд. Сам так спасал брата.
Нифига себе проблема, родственники маются. Без вариантов — адекватный вывод из запоя цены и условия. Тут тебе не частная лавочка. Между нами, нажимайте и читайте — вывод из запоя стоимость https://vyvod-iz-zapoya-na-domu-voronezh-xrt.ru Организм не резиновый. Лучше один раз дернуться, чем потом скорую вызывать. Рекомендую эту наркологическую клинику.
Dolga leta sem se boril sam. Potem pa sem dobil pravi nasvet in vse se je postavilo na svoje mesto. Govorim o odvajanju od alkohola pri Dr Vorobjevu. Veste, ni lahko, ampak se da premagati. In kar je najpomembneje – ni treba v bolnišnico. Več o tem in o izkušnjah pacientov si lahko preberete neposredno na uradnem viru: ambulantno zdravljenje alkoholizma http://zdravljenjealkoholizma.com. Meni so resnično pomagali.
Če nekdo v vaši okolici potrebuje pomoč – najboljša odločitev je poklicati. Držim pesti!
китайский язык китайский язык
Zdravo, ljudje. Že dolgo sem iskal resnično rešitev. Ko gre za zdravljenje alkoholizma — veliko ljudi se muči v tišini. Prijatelj mi je priporočil en center, kjer imajo izkušnje. Govorim o zdravljenju po metodi dr. Vorobjeva. Vse podrobnosti in izkušnje drugih ljudi najdete tukaj: odvisnost od alkohol odvisnost od alkohol Po nekaj tednih sem začutil razliko. Ni lahko priznati si, da imaš težavo. Ampak ko enkrat najdeš pravo pomoč — upanje se vrne. Več kot vredno je poskusiti. Srečno na tej poti!
Ох уж это, родственники на нервах. Что делать — непонятно. Проверенный вариант — качественный вывод из запоя на дому. Там реальные врачи. Короче, вот вам информация — вывод из запоя цены воронеж вывод из запоя цены воронеж Каждая пьянка минус ресурс. Лучше решить проблему сейчас, чем хоронить близкого. Серьезно ребят.
Слушай, родственники маются. Как есть — только срочный вывод из запоя. Врачи с допуском. Короче говоря, вот нормальный расклад — снять запой на дому https://vyvod-iz-zapoya-na-domu-voronezh-xrt.ru Печень вообще молчит. Лучше один раз дернуться, чем труп из квартиры выносить. Проверенный вариант по городу.
Dolga leta sem se boril sam. Potem pa sem dobil pravi nasvet in vse se je spremenilo. Govorim o zdravljenju alkoholizma pri strokovnjakih, ki res znajo pomagati. Veste, ni lahko, ampak se da premagati. In kar je najpomembneje – program je prilagojen posamezniku. Vse informacije in izkušnje drugih sem podrobno pregledal na spletni strani, posodobljene podatke pa si lahko ogledate tukaj: alkoholizem alkoholizem. Po prvem tednu sem začutil razliko.
Če vi ali kdo od vaših bližnjih potrebuje pomoč – najboljša odločitev je poklicati. Vse se da, če hočeš.
Честно говоря, куча народу сталкивается. Ситуация аховая. В этом вопросе очень важно не заниматься самодеятельностью. Нашел нормальный вариант — вывод из запоя на дому. Ребята реально шарят. Короче, жмите сюда чтобы узнать подробности — помощь при запое на дому https://vyvod-iz-zapoya-na-domu-voronezh-kmp.ru Промедление смерти подобно, потому что алкоголь — это яд. Сам так спасал брата.
Veliko sem prebral in slišal o tem. Ko sem prvič slišal za ambulantno zdravljenje alkoholizma po metodi Dr Vorobjeva, sem bil skeptičen. Ampak ko sem prebral izkušnje anderen — moje mnenje se je obrnilo. Alkoholizem uničuje družine. In najhuje je, da ljudje se sramujejo prositi za pomoč. Zato priporočam, da preverite celoten postopek na spletni strani, ki so na voljo na tej povezavi: odvajanje od alkohola odvajanje od alkohola. Na tej povezavi so odgovori na vsa vprašanja.
Meni je ta pristop pomagal. Če poznate koga, ki potrebuje pomoč — vzemite si čas in preberite. Vsak dan je nova priložnost.
курсы английского курсы английского
best darknet markets https://sites.google.com/view/darknetmarkets dark web market list https://sites.google.com/view/darknetmarkets
Блин, каждое утро одно и то же. Руки опускаются. Проверенный вариант — адекватный вывод из запоя цены указаны. Там реальные врачи. Короче, там все по полочкам — снятие интоксикации на дому снятие интоксикации на дому Не ждите чуда. Лучше решить проблему сейчас, чем потом собирать по кускам. Серьезно ребят.
Нифига себе проблема, человек просто в штопоре. Как есть — круглосуточный вывод из запоя без отмазок. Ребята работают чисто. Между нами, там все подробно расписано — вывести из запоя на дому вывести из запоя на дому Печень вообще молчит. Поверьте моему опыту, чем потом скорую вызывать. Рекомендую эту наркологическую клинику.
Živjo vsem. Že dolgo sem iskal resnično rešitev. Ko gre za zdravljenje alkoholizma — to je res težka zadeva. Prijatelj mi je priporočil en center, kjer ne obetajo nemogočega. Govorim o Dr Vorobjev centru. Več informacij je na voljo tu: ambulantno zdravljenje alkoholizma http://www.alkoholizem-zdravljenje.com Po nekaj tednih sem začutil razliko. Ni lahko priznati si, da imaš težavo. Ampak ko dobiš strokovno podporo — upanje se vrne. Če kdo dvomi, naj kar pokliče in vpraša. Vsak nov dan je priložnost.
Представьте ситуацию, куча народу сталкивается. Ситуация аховая. В такой теме главное не заниматься самодеятельностью. Нашел нормальный вариант — срочный вывод из запоя. Клиника с лицензией. Короче, вот собственно источник — вывод из запоя прайс https://vyvod-iz-zapoya-na-domu-voronezh-kmp.ru Не тяните резину, потому что запой убивает почки и сердце. Настоятельно рекомендую.
китайский язык китайский язык
Блин, каждое утро одно и то же. Руки опускаются. Наркологическая клиника с выездом — круглосуточный вывод из запоя и стабилизация. Не шарлатаны какие-то. Короче, там все по полочкам — нарколог на дом вывод из запоя https://vyvod-iz-zapoya-na-domu-voronezh-bvc.ru Не ждите чуда. Сам через это прошел, чем хоронить близкого. Проверено на своей шкуре.
Да уж, соседи уже устали слушать эти крики. Без вариантов — нужен нормальный вывод из запоя на дому. Тут тебе не частная лавочка. Между нами, вот нормальный расклад — вывод из запоя цена на дому https://vyvod-iz-zapoya-na-domu-voronezh-xrt.ru Хватит надеяться на авось. Лучше один раз дернуться, чем труп из квартиры выносить. Рекомендую эту наркологическую клинику.
Emprestimos p2plendingportugal.com: uma analise das principais plataformas. Compare as taxas, os montantes minimos de investimento, as categorias de emprestimos disponiveis, os retornos, os mecanismos de protecao do investidor e as principais caracteristicas de cada servico.
курсы китайского курсы китайского
Знаете, куча народу сталкивается. Ситуация аховая. В такой теме главное не заниматься самодеятельностью. Посмотрите сами — вывод из запоя на дому. Клиника с лицензией. Короче, актуальный прайс и условия тут — вывод из запоя прайс https://vyvod-iz-zapoya-na-domu-voronezh-kmp.ru Звоните пока не поздно, потому что запой убивает почки и сердце. Настоятельно рекомендую.
Друзья, столкнулся с такой ситуацией. Человек просто в штопоре. Руки опускаются. Скорая не едет. Короче, врачи толковые попались — адекватный вывод из запоя цены приемлемые. Приехали. В общем, жмите чтобы не потерять — помощь вывода запоя https://vyvod-iz-zapoya-na-domu-voronezh-zqw.ru Не тяните. Скиньте кому надо.
Un analisis de las plataformas de crowdfundinginmobiliario-review.es en Espana para 2026 te ayudara a elegir la mejor opcion de inversion. Analizamos los servicios mas populares, las condiciones de participacion, los tipos de proyectos, la rentabilidad potencial, los riesgos y los beneficios de la inversion colectiva en bienes raices.
Люди, ситуация жуткая когда — человек уже пятый день под завязку. Дети плачут. А скорая не едет. Я через это прошёл. Короче, проверенный способ — лучшая наркологическая клиника с выездом. Откачали и спать уложили. В общем, там контакты и прайс и условия — вывод из запоя с выездом https://vyvod-iz-zapoya-na-domu-voronezh-jhg.ru Промедление реально убивает. Деньги потом не нужны будут. Перешлите тому кто в беде.
Une comparaison de plateforme de crowdfunding plateformes pour les investisseurs et les emprunteurs a l’heure de 2026. Les frais, les investissements minimums, les types de projets, les niveaux de fiabilite, les rendements attendus, les exigences legales et les criteres de selection sont abordes.
Блин, человек просто не просыхает. Что делать — непонятно. Наркологическая клиника с выездом — круглосуточный вывод из запоя и стабилизация. Там реальные врачи. Короче, там все по полочкам — нарколог на дом вывод из запоя https://vyvod-iz-zapoya-na-domu-voronezh-bvc.ru Организм не вывозит. Сам через это прошел, чем хоронить близкого. Очень советую эту контору.
Да уж, соседи уже устали слушать эти крики. Как есть — реальное выведение из запоя без кодировки. Врачи с допуском. Короче говоря, нажимайте и читайте — вывод из запоя на дому телефоны https://vyvod-iz-zapoya-na-domu-voronezh-xrt.ru Печень вообще молчит. Поверьте моему опыту, чем потом скорую вызывать. Рекомендую эту наркологическую клинику.
Uma analise do crowdfunding imobiliario em Portugal. Analise dos termos, montantes minimos, tipos de imoveis, riscos, rendibilidades e caracteristicas do mercado em 2026.
Veliko sem prebral in slišal o tem. Ko sem prvič slišal za odvajanje od alkohola po metodi Dr Vorobjev centra, sem bil skeptičen. Ampak ko sem prebral izkušnje anderen — ugotovil sem, da to res deluje. Vsak dan se veliko ljudi bori s to težavo. In najhuje je, da ljudje se sramujejo prositi za pomoč. Zato priporočam, da preverite celoten postopek na spletni strani, ki so na voljo na tej povezavi: Dr Vorobjev center https://www.alkoholizma-zdravljenje-si.com. Na tej povezavi so odgovori na vsa vprašanja.
Po dolgih letih sem končno našel rešitev. Če vas to zanima — to je lahko prelomnica v vašem življenju. Upam, da vam bo koristilo!
изучение китайского изучение китайского
Ce guide des pretparticipatiffrance.fr en France vous aidera a choisir la plateforme la plus adaptee a vos besoins. Nous analysons les conditions, la rentabilite, les risques, les exigences pour les participants, les methodes de financement et les principales differences entre les services les plus populaires.
Decouvrez les meilleurs projets plateforme de crowdfunding en France en 2026. Comparez les types de projets, les conditions d’investissement, les frais, les rendements potentiels, les niveaux de risque et les avantages pour l’investisseur.
Aprende como funciona crowdfundinginmobiliarioespana.es desde elegir una plataforma y un activo hasta generar ingresos. Un resumen de los modelos de inversion, los montos minimos, los terminos, las comisiones, los riesgos y los beneficios para los inversores privados.
Представьте ситуацию, многие не знают как быть. Каждые выходные одно и то же. В такой теме главное не заниматься самодеятельностью. Я нарыл инфу — выведение из запоя без госпитализации. Ребята реально шарят. Если честно, вот собственно источник — вывод из запоя стоимость https://vyvod-iz-zapoya-na-domu-voronezh-kmp.ru Звоните пока не поздно, так как один финал — реанимация. Проверено на себе.
Ох уж это, каждое утро одно и то же. Руки опускаются. Проверенный вариант — нормальное выведение из запоя капельницей. Не шарлатаны какие-то. Короче, смотрите сами по ссылке — снятие запоя цена https://vyvod-iz-zapoya-na-domu-voronezh-bvc.ru Не ждите чуда. Сам через это прошел, чем хоронить близкого. Серьезно ребят.
Слушай, родственники маются. Без вариантов — адекватный вывод из запоя цены и условия. Тут тебе не частная лавочка. Между нами, смотрите сами по ссылке — нарколог на дом вывод из запоя на дому нарколог на дом вывод из запоя на дому Печень вообще молчит. Поверьте моему опыту, чем потом скорую вызывать. Рекомендую эту наркологическую клинику.
Ребята, столкнулся с такой ситуацией. Родственник пьет без остановки. Нервов ни у кого нет. Скорая не едет. Короче, врачи толковые попались — срочный вывод из запоя круглосуточно. Приехали. В общем, там и контакты и прайс — вывод из запоя на дому цена вывод из запоя на дому цена Промедление смерти подобно. Сохраните себе.
Ребята, сталкивался сам с таким — отец просто умирает на глазах. Соседи звонят в дверь. Участковый разводит руками. У меня брат так чуть не загнулся. Короче, врачи-спасатели настоящие — профессиональное выведение из запоя капельницей. Примчались за час. В общем, сохраняйте себе на будущее — срочный вывод из запоя на дому https://vyvod-iz-zapoya-na-domu-voronezh-jhg.ru Не тяните резину. Деньги потом не нужны будут. Перешлите тому кто в беде.
Закажите септик мск для дома, дачи или коммерческого объекта. Надежные станции биологической очистки, современные системы автономной канализации, доставка, установка под ключ, гарантийное обслуживание и помощь в выборе оптимальной модели.
Уничтожение клопов https://x99999.ru и тараканов в Красноярске с гарантией результата. Профессиональная обработка квартир, домов, офисов и коммерческих помещений. Современные безопасные средства, быстрый выезд специалистов, доступные цены и эффективное избавление от насекомых.
каталонский кирпич софит для фасада
китайские пословицы китайские пословицы
Že kar nekaj časa spremljam to temo. Ko sem prvič slišal za odvajanje od alkohola po metodi Dr Vorobjev centra, sem bil skeptičen. Ampak ko sem prebral izkušnje anderen — ugotovil sem, da to res deluje. Vsak dan se veliko ljudi bori s to težavo. In najhuje je, da ne poznajo dobrih možnosti zdravljenja. Zato svetujem, da si vzamete čas in preberete posodobljene podatke, ki so na voljo na tej povezavi: ambulantno zdravljenje alkoholizma http://alkoholizma-zdravljenje-si.com. Na tej povezavi so odgovori na vsa vprašanja.
Po dolgih letih sem končno našel rešitev. Če se soočate s podobno težavo — vzemite si čas in preberite. Upam, da vam bo koristilo!
Нифига себе проблема, родственники маются. Без вариантов — нужен нормальный вывод из запоя на дому. Тут тебе не частная лавочка. Между нами, вот нормальный расклад — вывод из запоя недорого вывод из запоя недорого Печень вообще молчит. Поверьте моему опыту, чем потом скорую вызывать. Рекомендую эту наркологическую клинику.
Блин, родственники на нервах. Что делать — непонятно. Наркологическая клиника с выездом — нормальное выведение из запоя капельницей. Там реальные врачи. Короче, там все по полочкам — срочный вывод из запоя срочный вывод из запоя Не ждите чуда. Сам через это прошел, чем хоронить близкого. Серьезно ребят.
Честно говоря, родственники просто в тупике. Каждые выходные одно и то же. В такой теме главное не заниматься самодеятельностью. Нашел нормальный вариант — срочный вывод из запоя. Там работают толковые врачи. Если честно, вся инфа тут — вывод из запоя цена на дому https://vyvod-iz-zapoya-na-domu-voronezh-kmp.ru Звоните пока не поздно, так как алкоголь — это яд. Настоятельно рекомендую.
Слушайте, попал в такую передрягу. Близкий уже неделю не просыхает. Нервов ни у кого нет. Скорая не едет. Короче, только это и работает — профессиональный вывод из запоя на дому. Откачали за час. В общем, жмите чтобы не потерять — вывод из запоя недорого вывод из запоя недорого Не тяните. Сохраните себе.
изучение английского изучение английского
Action tips: Inscribed Ossuary
Ежедневный обзор: https://aromline.ru/index.php?productID=9012
Все подробности: https://uborkadom.ru
Ребята, сталкивался сам с таким — отец просто умирает на глазах. Дети плачут. А скорая не едет. Сам был в такой жопе. Короче, проверенный способ — профессиональное выведение из запоя капельницей. Поставили систему за 20 минут. В общем, сохраняйте себе на будущее — выведение из запоя на дому воронеж https://vyvod-iz-zapoya-na-domu-voronezh-jhg.ru Промедление реально убивает. Здоровье дороже. Перешлите тому кто в беде.
Нифига себе проблема, родственники маются. Как есть — нужен нормальный вывод из запоя на дому. Ребята работают чисто. Между нами, вот нормальный расклад — стоимость вывода из запоя https://vyvod-iz-zapoya-na-domu-voronezh-xrt.ru Печень вообще молчит. Лучше один раз дернуться, чем труп из квартиры выносить. Рекомендую эту наркологическую клинику.
Сил уже нет, родственники на нервах. Что делать — непонятно. Наркологическая клиника с выездом — качественный вывод из запоя на дому. Там реальные врачи. Короче, там все по полочкам — вывод из запоя на дому недорого вывод из запоя на дому недорого Не ждите чуда. Сам через это прошел, чем потом собирать по кускам. Серьезно ребят.
Честно говоря, родственники просто в тупике. Достали уже эти срывы. В такой теме главное не заниматься самодеятельностью. Я нарыл инфу — вывод из запоя на дому. Ребята реально шарят. Если честно, жмите сюда чтобы узнать подробности — вывод из запоя на дому недорого https://vyvod-iz-zapoya-na-domu-voronezh-kmp.ru Звоните пока не поздно, потому что алкоголь — это яд. Проверено на себе.
Слушайте, столкнулся с такой ситуацией. Родственник пьет без остановки. Руки опускаются. Скорая не едет. Короче, врачи толковые попались — качественная наркологическая клиника на выезде. Откачали за час. В общем, смотрите сами по ссылке — откапаться на дому https://vyvod-iz-zapoya-na-domu-voronezh-zqw.ru Не надейтесь на авось. Скиньте кому надо.
Главные новости: https://eco-naturel.com/k2_1144.php
Ох уж это, человек просто не просыхает. Руки опускаются. Наркологическая клиника с выездом — адекватный вывод из запоя цены указаны. Ребята знают свое дело. Короче, тыкайте сюда — нарколог на дом вывод из запоя на дому нарколог на дом вывод из запоя на дому Не ждите чуда. Сам через это прошел, чем потом собирать по кускам. Проверено на своей шкуре.
Люди, ситуация жуткая когда — отец просто умирает на глазах. Жена в слезах. Участковый разводит руками. Сам был в такой жопе. Короче, только это и работает — адекватный вывод из запоя цены нормальные. Откачали и спать уложили. В общем, сохраняйте себе на будущее — помощь вывода запоя https://vyvod-iz-zapoya-na-domu-voronezh-jhg.ru Не надейтесь на авось. Деньги потом не нужны будут. Перешлите тому кто в беде.
Представьте ситуацию, родственники просто в тупике. Достали уже эти срывы. В такой теме главное не заниматься самодеятельностью. Посмотрите сами — вывод из запоя на дому. Ребята реально шарят. Короче, вся инфа тут — выведение из запоя на дому https://vyvod-iz-zapoya-na-domu-voronezh-kmp.ru Звоните пока не поздно, потому что алкоголь — это яд. Настоятельно рекомендую.
Слушайте, попал в такую передрягу. Близкий уже неделю не просыхает. Руки опускаются. В больницу тащить страшно. Короче, единственное что реально помогло — адекватный вывод из запоя цены приемлемые. Откачали за час. В общем, вся информация вот здесь — снятие интоксикации на дому снятие интоксикации на дому Не тяните. Скиньте кому надо.
Товарищи, представляете кошмар — близкий совсем не выходит из штопора. Дети плачут. Участковый разводит руками. Сам был в такой жопе. Короче, единственное что реально вывезло — качественный вывод из запоя на дому. Откачали и спать уложили. В общем, смотрите сами по ссылке — откапаться на дому https://vyvod-iz-zapoya-na-domu-voronezh-jhg.ru Не надейтесь на авось. Деньги потом не нужны будут. Перешлите тому кто в беде.
Народ, столкнулся с такой ситуацией. Близкий уже неделю не просыхает. Нервов ни у кого нет. Участковый только руками разводит. Короче, только это и работает — нормальное выведение из запоя капельницей. Поставили систему. В общем, вся информация вот здесь — вывод из запоя на дому круглосуточно https://vyvod-iz-zapoya-na-domu-voronezh-zqw.ru Не тяните. Скиньте кому надо.
Последние изменения: https://igrushenka.ru
Details inside: Madison Biblical Archaeology Society (MBAS)
Люди, сталкивался сам с таким — отец просто умирает на глазах. Жена в слезах. А скорая не едет. У меня брат так чуть не загнулся. Короче, единственное что реально вывезло — лучшая наркологическая клиника с выездом. Откачали и спать уложили. В общем, сохраняйте себе на будущее — вывод из запоя на дому цена https://vyvod-iz-zapoya-na-domu-voronezh-jhg.ru Не надейтесь на авось. Деньги потом не нужны будут. Перешлите тому кто в беде.
Народ, бывает же такое горе. Человек просто в штопоре. Нервов ни у кого нет. Участковый только руками разводит. Короче, врачи толковые попались — нормальное выведение из запоя капельницей. Приехали. В общем, вся информация вот здесь — помощь вывода запоя https://vyvod-iz-zapoya-na-domu-voronezh-zqw.ru Не надейтесь на авось. Скиньте кому надо.
Все самое свежее здесь: https://slovarsbor.ru/w/%D0%BD%D0%B5%D0%B2%D0%B5%D1%80%D0%BD%D1%8B%D0%B9/
Современная спецтехника https://u-misti.dp.ua/kakaya-kategoriya/ помогает эффективно выполнять строительные, дорожные и производственные работы. Экскаваторы, погрузчики, катки и другая техника позволяют сократить сроки реализации проектов, повысить производительность и снизить затраты на выполнение сложных задач.
Como investir em crowdfundingimobiliario-guide.com em Portugal atraves de plataformas de crowdfunding em 2026. Compare servicos, analise termos, investimento minimo, potencial de lucro, riscos, imoveis disponiveis e criterios para escolher uma plataforma fiavel.
Como investir em crowdfundingimobiliario-guide.com em Portugal atraves de plataformas de crowdfunding em 2026. Compare servicos, analise termos, investimento minimo, potencial de lucro, riscos, imoveis disponiveis e criterios para escolher uma plataforma fiavel.
Если интересует строительство дома https://5стен.рф под ключ, полезно заранее изучить доступные проекты, планировки и стоимость работ. Подробная информация доступна на сайте
Слушайте сюда. Столкнулся с настоящей бедой. Близкий человек уже третьи сутки в штопоре. Соседи уже стучат. Скорая не приезжает на такие вызовы. Короче, единственное что реально помогло — лучшая наркологическая клиника с выездом. Поставили систему. В общем, смотрите сами по ссылке — стоимость вывода из запоя стоимость вывода из запоя Не надейтесь на авось. Перешлите тому кому надо.
Ребята привет. Жесть просто полная. Брат пьёт без остановки. Дети не спят ночами. Скорая не едет на такие вызовы. Короче, нормальные врачи попались — лучшая наркологическая клиника с выездом. Откачали за час. В общем, смотрите сами по ссылке — сколько стоит вывод из запоя сколько стоит вывод из запоя Каждый час на счету. Перешлите другу в беде.
сколько стоит подписчик в телеграм купить подписчиков в Телеграм
Ребята, бывает же такое горе. Человек просто в штопоре. Нервов ни у кого нет. Участковый только руками разводит. Короче, единственное что реально помогло — профессиональный вывод из запоя на дому. Откачали за час. В общем, вся информация вот здесь — нарколог на дом вывод из запоя нарколог на дом вывод из запоя Не надейтесь на авось. Сохраните себе.
Люди, ситуация жуткая когда — человек уже пятый день под завязку. Соседи звонят в дверь. А скорая не едет. У меня брат так чуть не загнулся. Короче, проверенный способ — профессиональное выведение из запоя капельницей. Откачали и спать уложили. В общем, сохраняйте себе на будущее — нарколог на дом вывод из запоя на дому нарколог на дом вывод из запоя на дому Промедление реально убивает. Здоровье дороже. Перешлите тому кто в беде.
Longer Text Here: mr pacho casino
Looking for information about artists or concerts? Head to http://prosportsmusic.com – your best choice for finding music content.
Слушайте сюда. Попал в такую передрягу. Близкий человек уже третьи сутки в штопоре. Дети не спят по ночам. Платные клиники просят бешеные деньги. Короче, только это и спасло — профессиональное выведение из запоя капельницей. Поставили систему. В общем, смотрите сами по ссылке — выведение из запоя на дому выведение из запоя на дому Не надейтесь на авось. Перешлите тому кому надо.
Слушайте что расскажу. Столкнулся с такой бедой. Отец не выходит из штопора. Жена рыдает. Скорая не едет на такие вызовы. Короче, нормальные врачи попались — качественное выведение из запоя капельницей. Поставили капельницу. В общем, там и контакты и прайс — вывести из запоя на дому вывести из запоя на дому Не надейтесь на авось. Скиньте кому надо.
Ребята, сталкивался сам с таким — близкий совсем не выходит из штопора. Жена в слезах. Участковый разводит руками. У меня брат так чуть не загнулся. Короче, только это и работает — качественный вывод из запоя на дому. Поставили систему за 20 минут. В общем, вся инфа вот здесь — вывод из запоя цены воронеж https://vyvod-iz-zapoya-na-domu-voronezh-jhg.ru Не надейтесь на авось. Деньги потом не нужны будут. Перешлите тому кто в беде.
Народ привет. Попал в такую передрягу. Близкий человек уже третьи сутки в штопоре. Жена в истерике. В диспансер везти — на всю жизнь учёт. Короче, только это и спасло — профессиональное выведение из запоя капельницей. Отошёл за полчаса. В общем, вся инфа вот здесь — стоимость вывода из запоя стоимость вывода из запоя Не надейтесь на авось. Перешлите тому кому надо.
Слушайте что расскажу. Столкнулся с такой бедой. Муж просто исчезает в бутылке. Соседи стучат в дверь. В диспансер везти — клеймо на всю жизнь. Короче, нормальные врачи попались — доступный вывод из запоя цены адекватные. Откачали за час. В общем, смотрите сами по ссылке — нарколог на дом вывод из запоя https://vyvod-iz-zapoya-na-domu-voronezh-fds.ru Не надейтесь на авось. Скиньте кому надо.
Ребята выручайте. Влип я конкретно. Брат пьёт без остановки. Жена вся в слезах. Скорая не едет на такие вызовы. Короче, только это и вытащило — профессиональный вывод из запоя на дому. Откачали за час. В общем, смотрите сами по ссылке — вывод из запоя с выездом https://vyvod-iz-zapoya-na-domu-voronezh-eio.ru Не надейтесь на авось. Перешлите тому кому надо.
Друзья ситуация жуткая. Жесть полная случилась. Муж просто исчез в бутылке. Дети не спят по ночам. Платные клиники просят бешеные деньги. Короче, единственное что реально помогло — адекватный вывод из запоя цены нормальные. Приехали через час. В общем, там контакты и прайс и условия — вывод из запоя цена вывод из запоя цена Не надейтесь на авось. Скиньте другу в беде.
Read More: https://vantageautopart.com/uncategorised/instant-finance-managing-money-in-australian-casinos/
darknet marketplace https://sites.google.com/view/darknetmarkets darkmarket url https://sites.google.com/view/darknetmarkets
Самарцы привет. Жесть случилась полная. Брат пьёт без остановки. Жена в слезах. Скорая не едет. Короче, только это и спасло — анонимный вывод из запоя без последствий. Поставили систему. В общем, сохраняйте на будущее — вывести из запоя срочно https://vyvod-iz-zapoya-na-domu-samara-abc.ru Не тяните. Скиньте другу в беде.
Друзья ситуация. Столкнулся с такой бедой. Брат пьёт без остановки. Соседи стучат в дверь. Платные клиники просят бешеные деньги. Короче, нормальные врачи нашлись — качественный вывод из запоя на дому. Поставили систему. В общем, там контакты и прайс — вывести из запоя на дому вывести из запоя на дому Каждая минута дорога. Скиньте другу в беде.
Ребята привет. Жесть просто полная. Близкий человек уже шестой день в завязке. Соседи стучат в дверь. Скорая не едет на такие вызовы. Короче, нормальные врачи попались — профессиональный вывод из запоя на дому. Приехали быстро. В общем, смотрите сами по ссылке — вывод из запоя круглосуточно вывод из запоя круглосуточно Каждый час на счету. Перешлите другу в беде.
Самарцы привет. Столкнулся с такой бедой. Брат пьёт без остановки. Жена в слезах. В диспансер везти — учёт на всю жизнь. Короче, только это и спасло — профессиональное выведение из запоя капельницей. Поставили систему. В общем, вся инфа вот здесь — срочный вывод из запоя срочный вывод из запоя Не надейтесь на авось. Перешлите тому кому надо.
Слушайте что расскажу. Жесть случилась полная. Брат пьёт без остановки. Дети не спят ночами. В диспансер везти — учёт на всю жизнь. Короче, единственное что реально помогло — анонимный вывод из запоя без последствий. Приехали через час. В общем, там контакты и прайс — врач вывод из запоя https://vyvod-iz-zapoya-na-domu-samara-def.ru Не надейтесь на авось. Скиньте другу в беде.
Друзья ситуация. Попал в жесть полную. Отец не выходит из запоя. Соседи стучат в дверь. Скорая не едет на такие вызовы. Короче, нормальные врачи нашлись — лучшая наркологическая клиника с выездом. Откачали за час. В общем, сохраняйте на будущее — вывод из запоя на дому недорого https://vyvod-iz-zapoya-na-domu-voronezh-eio.ru Каждый час на счету. Скиньте другу в беде.
Медицинский справочник https://medoops.ru болезней и лекарств с описанием симптомов, причин, методов диагностики и лечения. Информация о препаратах, показаниях, противопоказаниях и рекомендациях для общего ознакомления.
Слушайте сюда. Столкнулся с настоящей бедой. Брат пьёт без остановки. Жена в истерике. В диспансер везти — на всю жизнь учёт. Короче, единственное что реально помогло — адекватный вывод из запоя цены нормальные. Приехали через час. В общем, там контакты и прайс и условия — снять запой на дому https://vyvod-iz-zapoya-na-domu-voronezh-ayu.ru Не надейтесь на авось. Перешлите тому кому надо.
Expand at the link: https://ketentrust.digital
Full version of the article: https://dtsetnexus.digital
Слушайте что расскажу. Жесть случилась полная. Муж просто пропадает. Жена в слезах. Скорая не едет. Короче, нормальные врачи нашлись — вывод из запоя дешево и сердито. Поставили систему. В общем, там контакты и прайс — вывод из запоя самара на дому https://vyvod-iz-zapoya-na-domu-samara-abc.ru Не тяните. Перешлите тому кому надо.
Народ выручайте. Столкнулся с такой бедой. Отец не выходит из штопора. Жена рыдает. Платные клиники ломят космос. Короче, только это и вытащило — профессиональный вывод из запоя на дому. Откачали за час. В общем, вся информация вот здесь — помощь при запое на дому https://vyvod-iz-zapoya-na-domu-voronezh-fds.ru Не надейтесь на авось. Скиньте кому надо.
Народ выручайте. Жесть случилась полная. Человек уже четвёртые сутки в штопоре. Жена в слезах. В диспансер везти — учёт на всю жизнь. Короче, единственное что реально помогло — профессиональное выведение из запоя капельницей. Отошёл за полчаса. В общем, жмите чтобы не потерять — вывод из запоя стоимость https://vyvod-iz-zapoya-na-domu-voronezh-plk.ru Не надейтесь на авось. Перешлите тому кому надо.
Ударно-волновая терапия https://novogireevo-klinika.ru в Пушкино — эффективный метод лечения хронической боли, воспалений сухожилий и суставов. Консультация врача, подбор курса процедур, современное оборудование, комфортные условия и профессиональный подход к восстановлению здоровья.
Слушайте что расскажу. Попал в жесть полную. Отец не выходит из запоя. Соседи стучат в дверь. В диспансер везти — на всю жизнь учёт. Короче, единственное что реально помогло — срочный вывод из запоя круглосуточно. Примчались быстро. В общем, жмите чтобы не потерять — помощь вывода запоя https://vyvod-iz-zapoya-na-domu-voronezh-eio.ru Не тяните. Перешлите тому кому надо.
Друзья ситуация. Столкнулся с такой бедой. Близкий не выходит из запоя. Соседи стучат в дверь. Скорая не едет. Короче, единственное что реально помогло — анонимный вывод из запоя без последствий. Приехали через час. В общем, жмите чтобы не потерять — вывод из запоя анонимно недорого вывод из запоя анонимно недорого Не тяните. Перешлите тому кому надо.
Ребята выручите. Попал в такую передрягу. Близкий человек уже третьи сутки в штопоре. Жена в истерике. Скорая не приезжает на такие вызовы. Короче, единственное что реально помогло — качественный вывод из запоя на дому. Поставили систему. В общем, вся инфа вот здесь — срочный вывод из запоя срочный вывод из запоя Каждая минута дорога. Скиньте другу в беде.
Things Worth Watching: https://24matrixtech.click
Longreads and hits: https://aciculaelyxhub.digital
Слушайте что расскажу. Жесть случилась полная. Брат пьёт без остановки. Жена в слезах. Платные клиники просят бешеные деньги. Короче, единственное что реально помогло — анонимный вывод из запоя без последствий. Отошёл за полчаса. В общем, сохраняйте на будущее — цена вывод из запоя на дому https://vyvod-iz-zapoya-na-domu-samara-def.ru Не тяните. Скиньте другу в беде.
Народ выручайте. Жесть случилась полная. Муж просто пропадает. Соседи стучат в дверь. В диспансер везти — учёт на всю жизнь. Короче, только это и спасло — анонимный вывод из запоя без последствий. Отошёл за полчаса. В общем, жмите чтобы не потерять — вывод из запоя самара на дому https://vyvod-iz-zapoya-na-domu-samara-abc.ru Каждая минута дорога. Перешлите тому кому надо.
Ребята привет. Жесть просто полная. Близкий человек уже шестой день в завязке. Дети не спят ночами. Скорая не едет на такие вызовы. Короче, единственное что реально работает — профессиональный вывод из запоя на дому. Приехали быстро. В общем, смотрите сами по ссылке — снятие интоксикации на дому снятие интоксикации на дому Каждый час на счету. Скиньте кому надо.
Слушайте что расскажу. Столкнулся с такой бедой. Человек уже четвёртые сутки в штопоре. Дети не спят ночами. Скорая не едет. Короче, нормальные врачи нашлись — лучшая наркологическая клиника с выездом. Поставили систему. В общем, смотрите сами по ссылке — срочный вывод из запоя на дому https://vyvod-iz-zapoya-na-domu-voronezh-plk.ru Не надейтесь на авось. Скиньте другу в беде.
Друзья ситуация жуткая. Столкнулся с настоящей бедой. Отец не вылезает из запоя. Жена в истерике. Скорая не приезжает на такие вызовы. Короче, нормальные врачи нашлись — адекватный вывод из запоя цены нормальные. Приехали через час. В общем, смотрите сами по ссылке — снятие интоксикации на дому снятие интоксикации на дому Каждая минута дорога. Перешлите тому кому надо.
Ребята выручайте. Попал в жесть полную. Человек уже пятый день в штопоре. Жена вся в слезах. Скорая не едет на такие вызовы. Короче, нормальные врачи нашлись — качественное выведение из запоя капельницей. Примчались быстро. В общем, там контакты и прайс и условия — нарколог на дом вывод из запоя https://vyvod-iz-zapoya-na-domu-voronezh-eio.ru Не тяните. Перешлите тому кому надо.